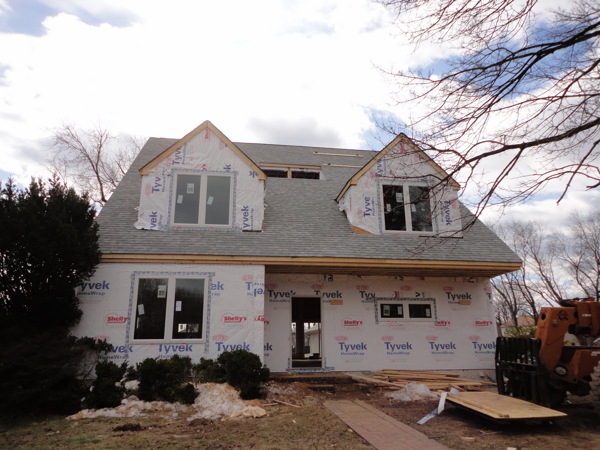
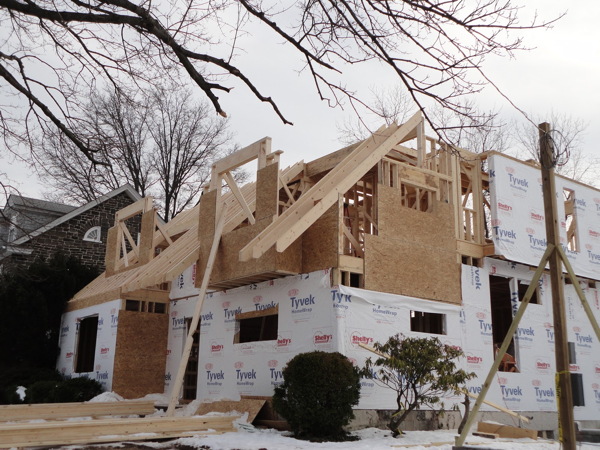
Work has begun inside, and not much looks different outside, yet we have some new photos of the house from the owner.
There is some house wrap missing on this side, so still some catching up to do before the cladding goes on. The finish will be stucco. Click through for a photo browser of the new pictures.
Get the flash player here: http://www.adobe.com/flashplayer
Its official, the roof is on, the windows are in, the interior work will now commence in earnest.
Seems like just yesterday we were trying to imagine what the house would look like when the roof was framed, and here is all shingled up, all those wall holes filled with windows, and looking all very housey.
Well we have some treats for you today, because if you follow the link below not only will you find the usual selection of further images of the progress of the construction, but also two wonderful videos that the owner has made of a short walk-thru of the house. Its still all just framing inside, but there is no better way to finally understand the collection of rooms and spaces shown on a floor plan than to take a little stroll through them. So click on dear reader..
Get the flash player here: http://www.adobe.com/flashplayer
So called Advanced Framing has been promoted as a technique to improve efficiency and energy performance for house walls. But it also seems to have been designed to ensure that nobody adopts it.
First we should cover the basics - what is Advanced Framing? It is a "system" or practice of house framing that endeavors to reduce the amount of wood going into the wall, and as a result reduce thermal bridging and increase energy efficiency. It is also interchangeably referred to as Optimum Value Engineering or OVE which perhaps speaks more to the process that came up with this. Value Engineering has come to be a euphemism for cutting costs. In this case, cutting out everything but what is essential to frame a house.
Before we look at exactly how Advanced Framing accomplishes these goals let me just air my gripe. The details of the AF framing techniques are smart, efficient, and dare I say common sense. Yet taken as a whole "system" it is overly rigid, inflexible, and lacks resiliency. To follow a strict application building elements must fall on the proposed modular grid. This limits possibilities, and dooms existing house plans to significant redesign. Its lack of resiliency means its advantages can be quickly overcome by deviation from its strict use. And while it can save up to 20% in material, it really does not go far enough to create a high performance wall system. I feel this combination is a barrier to adoption that will prevent it from becoming the de-facto method for framing houses in the US. Yet many of the individual details are easy to implement, and many builders have already taken this hybrid approach. With the help of this diagram lets look at some of the key aspects of AF, the ones that are easiest to adopt.
Framing spaced at 24" on center. This is a common sense approach. As we put more insulation in our walls we move to larger studs. 2x6's are common, and I'm advocating for a move to 2x8s. These larger studs are strong enough to be spaced at 24"oc, rather than the 16"oc common with 2x4 walls. This wider spacing reduces the amount of wood in the wall, and increases the amount of insulation. Roof framing is easy to space at 24", and engineered lumber floor joists can span further than solid wood at 24" spacing. So yes, we can do this, easily, and it makes sense.
Lets look at the window and door openings. You will note in this diagram that there is a single stud at the side of the window opening. The window header, and the window sill frame are supported with metal clips mounting them to the single adjacent stud. In conventional framing there would be three studs here. A king stud that ran from sill to top plates. A jack stud which ran up to the underside of the header and supported it, and a similar stud for the sill called a cripple. By the time we reached the sill plate the jamb is three studs wide. A common hybrid is to simply remove the cripple studs and move to two studs, and for larger window openings with a bigger header this makes sense. This is easy to do no matter how the whole house is framed.
Insulated headers are another great practice here. Especially as we move on to 2x6 and even deeper 2x8 walls, we can now provide an insulation layer between the interior and exterior header members. This prevents the wall above the window and door openings from becoming a thermal bridge. There are even some products available that pre-assemble the header members with an insulation core.
Two stud corners are another easy to adopt practice. The AF wall has two studs at each corner, one oriented towards each wall panel that meets at the corner. Traditional framing would have a third stud which served to support the interior wall board at the corner. In the AF wall that is replaced by a metal clip, or a 1x nailer. This practice keeps the corner from bulking up with solid wood, and allows insulation to extend into the corner framing. Again, easy to do.
All that sounds good, so where is the problem? The problem is with the next element that AF seek to reduce. Instead of being easy to implement, it is difficult to implement, and instead of being a tidy self contained solution it is a solution that imposes on the rest of the entire house framing to pull it off successfully. I am talking of course about the "Single top plate". Perhaps the shortest note in that diagram causes the biggest trouble. Lets look at this.
The idea is simple. Walls are traditionally built with two top plates. That means in a 2x6 wall the studs are topped off by two 2x6s horizontal capping the studs and creating a bearing surface for floor framing and roof framing. Two studs are used because that gives the top plate enough strength to support a floor joist or roof rafter that does not fall directly above the stud below. But of course two top plates makes for a lot of solid wood through the wall - a thermal bridge. AF aspires to reduce that to a single top plate, cutting the size of the thermal bridge in half. But at what cost? In order to eliminate one of the two top plates we now have to ensure that the floor joists fall directly above the stud. In a two story house we also have to ensure that the studs of the wall above also align, as well as the roof rafters. Suddenly everything has to line up.
In concert with this AF proposes we eliminate the rim joist which is a solid piece of wood equal in depth to the floor joists that runs the perimeter of the wall. This rim joist aids in transferring mis-aligned loads from one floor to another. So studs in the second story wall need not align with the studs below. Without a rim joist, again, the studs above must align directly.
So how does this play out? Well its suddenly a great benefit to make all window and door openings fit within the spacing of the studs. Imagine if you have a window on the second floor that does not fall on the grid. This means a jamb stud will not be aligned to the studs below and some special care must be taken to support the load from its header. Another concern is engineered wood I beam joists. Without a rim joist hey are not strong enough to transfer the vertical loads by themselves and would require stiffeners. So either we return to using solid wood joists and the shorter spans they require, or we spend the labor to reinforce the ends of every joist. Lots of labor is rarely a good trade for a little material. We can add more studs to resolve these issues, but suddenly our 20% gain in material is dissolving.
What we are left with is an extremely rigid system for laying out a house on a grid. And all the flexibility we've given up is solely for the sake of losing one of the top plate members of the wall. This is simply not a well reasoned trade-off. In the end, its a deal killer. Designers find it frustrating and limiting. Builders are forced to completely redesign their stock of house designs. And in the end the return on performance is not that great. The wall studs still have no thermal break, and the performance is only slightly better than a conventionally framed wall.
Lets stop pretending that this is a "system". What we have here is a handful of helpful framing strategies, and one nearly preposterous idea about how to frame a house that nets a very small improvement in thermal bridging. Its time to stop patting ourselves on the back pretending we've really accomplished something with a claim of using "Advanced Framing" techniques. Some might call it "greenwashing", I just think its kidding ourselves. We need to do much more than this to build a high performance wall. We have better options.
The framing of the shell of the house is now done. There is a little bit more of partition framing going on inside, but soon the Electricians, Plumbers, and HVAC men will be on the job installing the guts of the house. Finish work to follow.
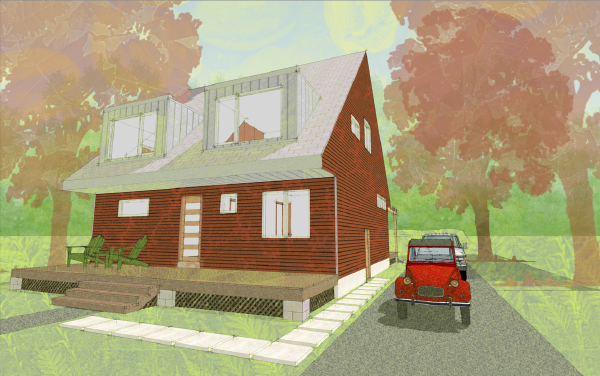
I'm very pleased with the how the house is coming out. The progress photos line up very nicely with the design sketches which is very gratifying. And best of all its shaping up to be one very cool house!
And after the link we have a photo browser with more pictures - enjoy!
Get the flash player here: http://www.adobe.com/flashplayer
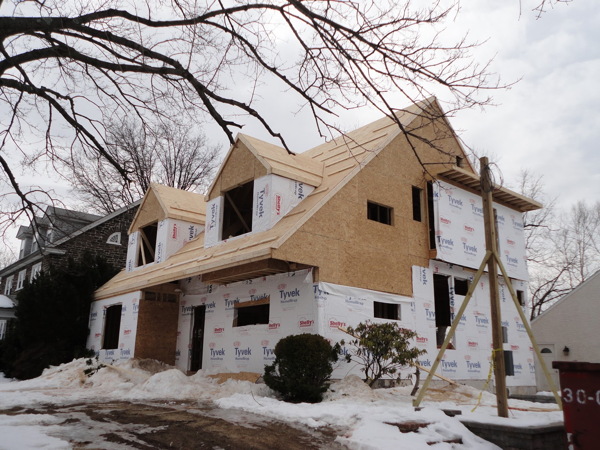
And neither do the carpenters. The roof is way along now, the front more so than the back, but we can see the massing of the house now. Its no longer overshadowed by its neighbor.
And after the link we have a photo browser with more photos.
Get the flash player here: http://www.adobe.com/flashplayer
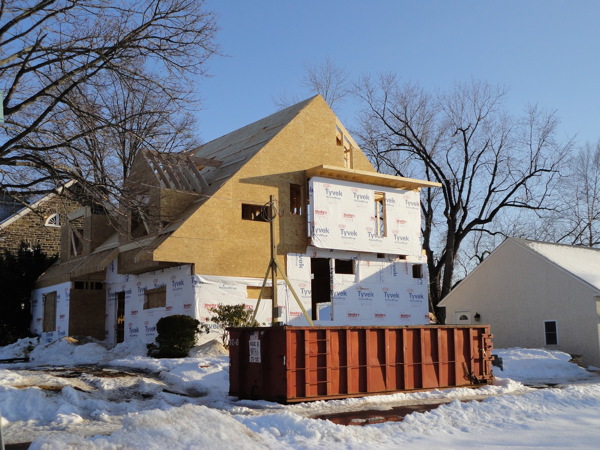
As the rafters begin to go in you can start to get a sense of the massing of the house.
If you take a look at the project page at our web site you'll see more illustrations of how the house will finally appear. This may help you make sense out of what the rafters are doing here.
The second floor partitions, and the roof in as much as it is tied together with the partitions, have begun to be framed up. Very soon the overall massing of the house will take shape. Already you can start to get a sense of the second floor spaces.
So click through to see the most recent photos from the second floor.
Get the flash player here: http://www.adobe.com/flashplayer
If looking at the floor plans of this design will help you understand what you are looking at in the photos then follow this link over to the project page at our web site. Remember, this house design shares its MoTrad DNA with our house plan the XHouse3.
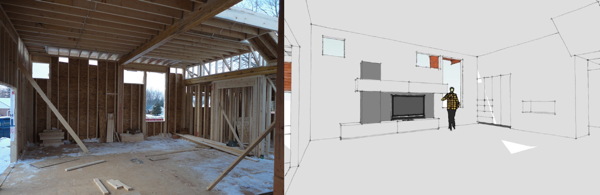
Not big news, but what this means is that since the second floor platform is in place you can now get a good sense of what the rooms on the ground floor feel like. Some new interior shots and a comparison to the design sketches.
So click through to see more of the main spaces from the ground floor shot from different angles. And I'm going to try to post a short video clip of the ground floor that the owner posted.
Get the flash player here: http://www.adobe.com/flashplayer
If you want to see more drawings of this design including floor plans to orient yourself to the photos then skip over to the project page at our web site. Remember, this house design shares its MoTrad DNA with our house plan the XHouse3.
We've been kicking this idea around for about a year, ever since we created our 0970 Lagom House for a design contest. Inspired by our study of Swedish construction we wanted to create a high performance wall for the US market that lent itself to panel fabrication, and was accessible to any builder using the skills and experience they already have.
Why not use new materials and techniques? How can you make a New Wall that everybody is going to know how to build? We want to create a wall that can be widely adopted, something that any builder can start building tomorrow without any new training, without finding any new suppliers, with out changing the way they run their business. If we want the greatest number of builders to build more efficient houses we need a wall they understand immediately, we need a wall that they can purchase materials for from their existing suppliers, use their existing sub-contractors, and a wall that is familiar enough for them to reliably price and schedule. New materials and new techniques throw off all of this and become barriers to adoption. We don't want barriers. We want everybody to start building more efficient houses. Continue reading for a detailed explanation of this simple but robust wall.
We proposed an initial version of this wall when we designed the Lagom House, but now we believe we've made significant improvements. Gone is the exterior foam insulation layer. Foam insulation is expensive, and it is difficult to place on the exterior without creating an unwanted vapor barrier. Instead we rely on lessons from the Swedish wall to replace the thermal break that foam offers.
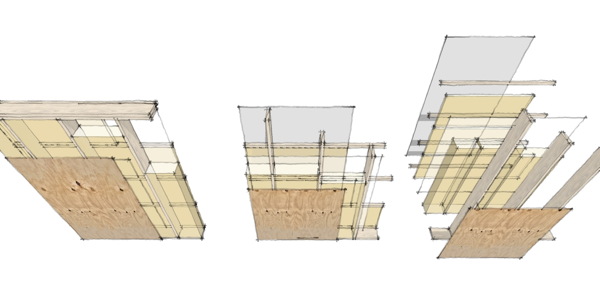
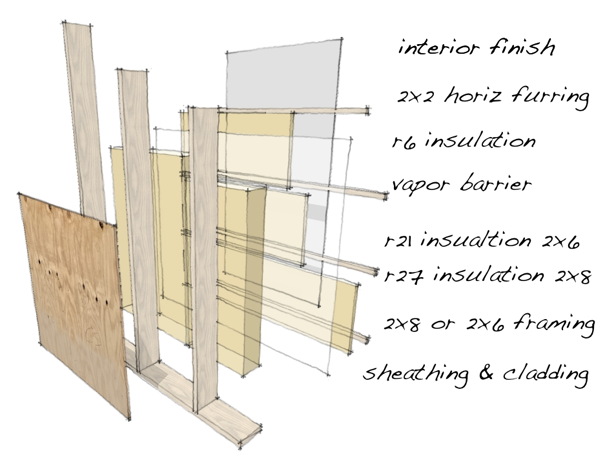
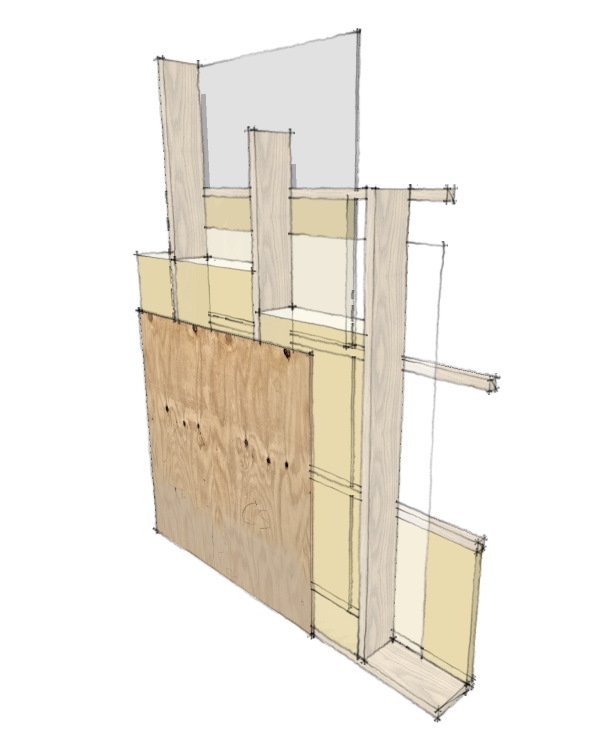
First we are starting this with a wall design for northern climates. Designs for southern climates are different, particularly in the vapor profile. So keep in mind this design is for a heating centric climate. We are planning this wall for 2x6 or 2x8 versions. The 2x8 versions offer a greater insulation level for those that desire it. Starting from the interior here are the layers of the wall system.
• Interior finish is assumed to be gypsum wall panels, the commodity wall finish in the USA.
• Next we have an electrical and plumbing furring space. This space is created with 2x2 furring members, and is insulated with fiber glass batts, 1.5" thick for an insulation value of R6-6.5 depending on the product chosen. This insulation is typically more rigid than batts and is sold as a fiberglass "board". This actually facilitates cutting openings for electrical boxes and other penetrations. The horizontal furring allows the insulation layer to break the thermal transfer of the main stud wall in the same way exterior foam insulation does, but it does so with out creating a problematic exterior vapor barrier, without expensive foam insulation, and with the added benefit of a dedicated wiring chase space that allows us to build a tighter primary wall. Thank you Sweden.
• Next is a continuous vapor barrier - a plastic sheet that runs continuously from top plate to floor plate. Because all of our wiring is in the furring space there is no reason to penetrate this vapor barrier allowing for a very air tight wall to be created.
• Next is our insulated stud space based on 2x8 or 2x6 studs, 24"oc will suffice for these strong studs. Un-faced batt insulation can be used since we have an independent vapor barrier layer. And since there is no wiring or other obstacles in the wall the batts can be installed neatly, and completely filling the voids. Batts have a bad reputation for sloppy insulation. One thing the Swedish walls show us is that its not the batts, but the obstacles that are the problem. These walls can be as tightly filled as any highly insulated wall without the wires and piping to struggle against. Now what insulation to use? The major insulation manufacturers in the US offer two densities. Always choose the higher density with the higher R value. For a 2x6 wall that will be R21 batts. For the 2x8 wall we have quandary - US manufacturers do not make batts for 2x8 walls. 2x6 walls, yes. 2x10 ceilings and floors, yes. 2x8s you are out of luck. Until they begin we have two options. We can use 8" R30 batts, and compress them 1" into the 7.25" space of a 2x8. This will diminish their R value somewhat - don't count on more than R28. Or you can do two layers: a 1.5" R6 + a 5.5" R21 for a total of R27. In the meantime, Owens Corning and Certainteed - WAKE UP! We need wall batts for 2x8 walls.
• Last but not least is our sheathing and exterior wall system. This remains open ended. Commodity builders are going to want to use their composite Zip sheathing and cheap vinyl siding. Green builders will use a sophisticated rain screen cladding system. And everything in between. All will work here.
Once accounting for total wall R values that take in studs and solid framed portions of the wall you can probably expect the 2x6 wall to come in R23-24, and the 2x8 wall R30-31. This is clearly enough to contribute to a Passive House, but even if you are not looking to build a certified house you have an easy to build high performance wall using commodity construction products. If we can get builders making houses with walls like these then soon we can forget about certifying standards and just build every house to a high level of performance. We can do this now. Its time to demand it.
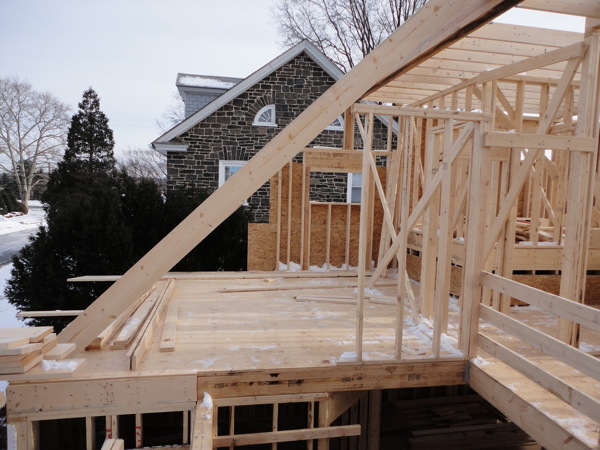
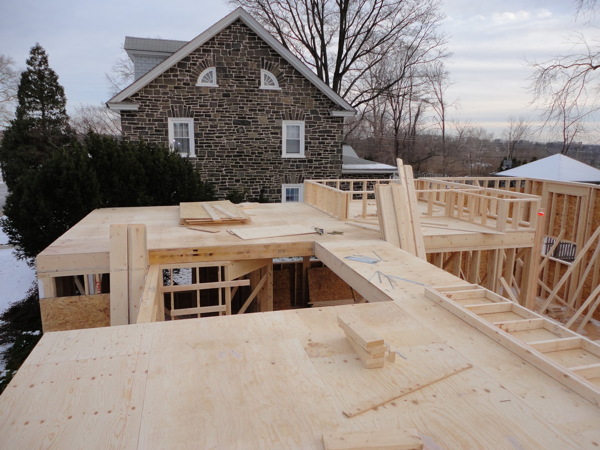
Snow over the weekend, and more coming today, has not slowed the pace of framing at the MoTrad House. The main level of the second floor platform is on and decked, and I suppose we can expect the master bedroom level to follow shortly.
I expected this project to move along more slowly than usual as the owner is doing GC duty himself. But I've been wrong at the framer is moving at a good clip, and the excavation and foundation work was well coordinated and happened quickly as well.
More photos if you click through to read the rest.
Get the flash player here: http://www.adobe.com/flashplayer
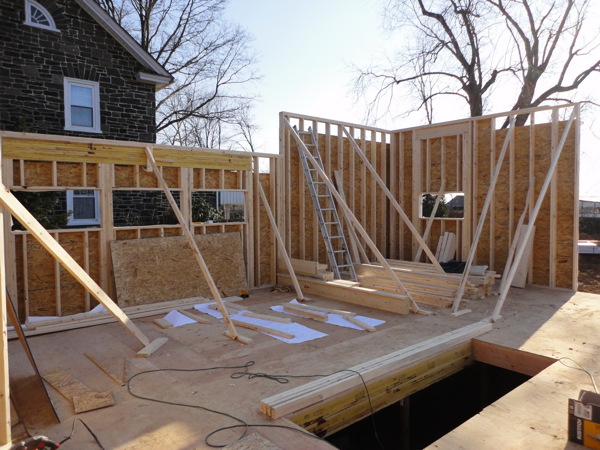
A quick transition to framing, and the walls are now rising quickly.
The height of the walls here gives us a little clue about the relative ceiling heights. The rear portion of the house at the kitchen and living room enjoy an extra hight ceiling due to the master suite being a few steps up from the rest of the second floor. Stay tuned for more as the carpenters always seem to make short work of the framing. You'll find a photo-browser with more images after the link.
Get the flash player here: http://www.adobe.com/flashplayer
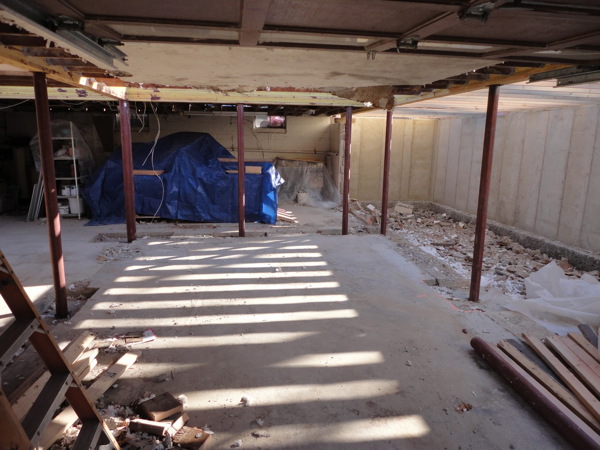
Everything that needs to happen below the ground floor is finishing up this week while we all enjoy the holidays. Posts and beams to support the existing ground floor, and what will come above are now in place, and they are preparing to waterproof the foundation so the earth can be backfilled.
There are a bunch of new photos of the nuts and bolts of this work in the extended post below. If such things interest you then by all means click on through.
Get the flash player here: http://www.adobe.com/flashplayer
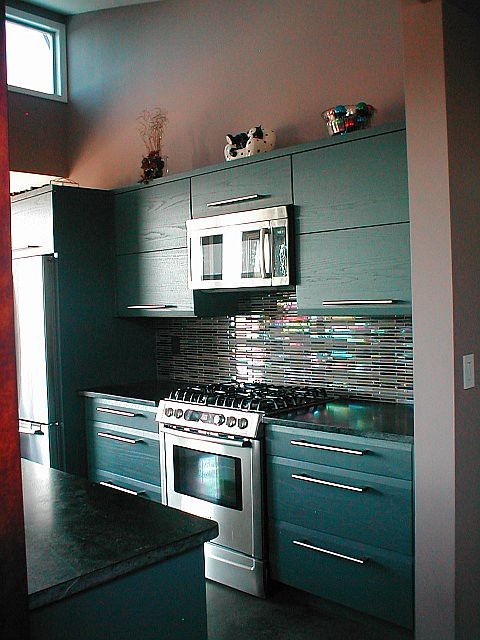
A nice surprise today in my email was a group of photos from the Owners of the Texas Plat House near Austin. They've been busy putting the finishing touches on their house and wanted to share!
Outside the deck has been sealed, and has taken on a deeper wood color. Inside they have tiled their backsplash with some great looking horizontal bar like tiles.
More photos of the finished kitchen and the rest of the work can be seen in the Texas Plat House flickr set. Remember - they are in the woodworking business, and built this kitchen themselves. Hook up with them for your project!
Just thought you would want to know - foundations and basement walls racing along. Next the new beams and posts in the basement, new first floor deck at the addition. Then the fun really begins!
Get the flash player here: http://www.adobe.com/flashplayer
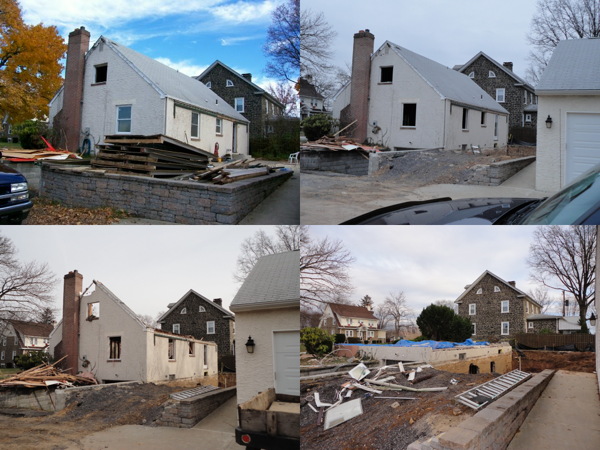
Things are moving right along with the MoTrad House project, that is if moving right along means leveling the existing house down to the ground floor, then yes, its moving right along in spades.
I know the idea here is to rebuild the house anew. And I know that this is what the owner wants, and I've actually helped him do that. Yup, but all the same there is something a undeniably disconcerting about seeing an existing house come down. Its like the 5 second rule when you drop a cookie on the floor. If you pick it right up - hey, that's still a good cookie. Right. Too late here. That cookie is gone.
Lots more pictures on the Flickr set. Demolition of the basement garage walls has happened, and prep for new foundations at the new bearing points is underway. You can see photos of that work as well as more of the demolition.
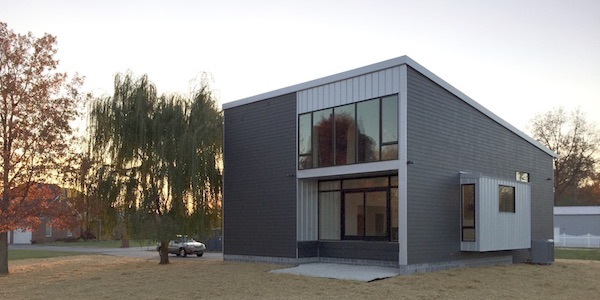
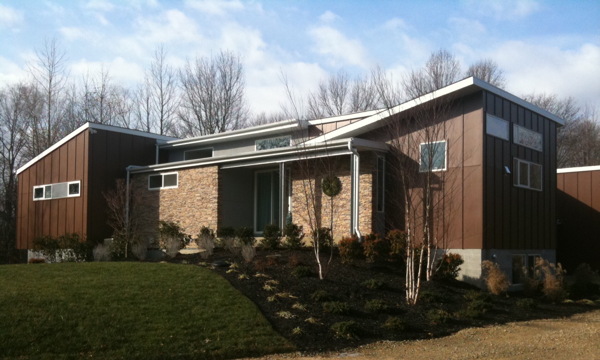
I received some current photos of the completed house from the Owner today. Its very gratifying to see an xmas wreath on the dining room wall, and the house participating in the life of the owner's this way.
This is what modern is about for us. Its not some minimal and stark photo in a magazine, its not unhappy hipsters ruminating about the pedigree of their design accessories. Its living a life like anybody lives in a modern home that is true to your values and represents who you are. And this time of year that means holiday decorations, sharing your home with your friends, and finding comfort and rejuvenation at home, something beyond the need for shelter and refuge. That by all means happens in a modern home as much as any other, don't let anybody suggest it is not so.
So for all you lucky enough to have your modern home, and all those still wishing for one, keep that hope alive for each other and have a good holiday. More new photos of the RS House are posted to the Flickr set.
Its always a good day when we get to announce the availability of a new set of Construction Prints. This means there is a new design that somebody could build, more possibilities, more opportunities, more options for folks who want a modern house.
The XHouse3 is part of our XHouse Collection, our group of designs intended to be responsive to current design trends. Furthermore the XHouse3 is our first houseplan in what I'm calling a MoTrad design theme - a fusion of traditional massing and form and a modern handling of space, detail, trim. The result is a house that lives comfortably with traditional houses side by side, but surrenders nothing in its commitment to living in today. It remains fully a modern house. There was a great mini review of this design on Ready Made Magazine's blog, written by one of their editors.
We had begun the Construction Prints in earnest back in March 2010. But it was delayed due to other activities, the complete redesign of the houseplan catalog, and following that the redesign of the web site for our local practice. We also worked on our new collaboration with Bensonwood during this time, so although the XHouse3 has been delayed, much has been accomplished in the meantime. We hope for the XHouse3 to also find its way into the Bensonwood offerings so that there can be a highly energy efficient option for this house as well.
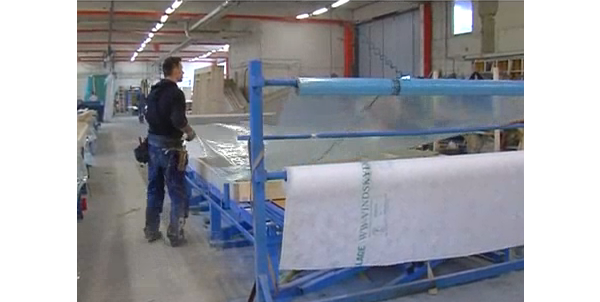
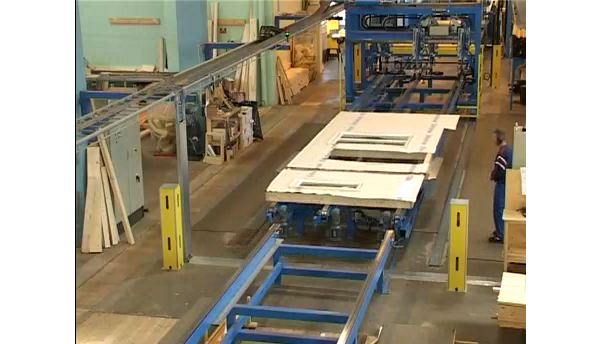
Last time we looked at a near fully automated closed wall panel assembly line. I said that you really don't need all that automation to build houses the Swedish way, so today we'll look at a much simplified process. This is the way most houses in Sweden are built.
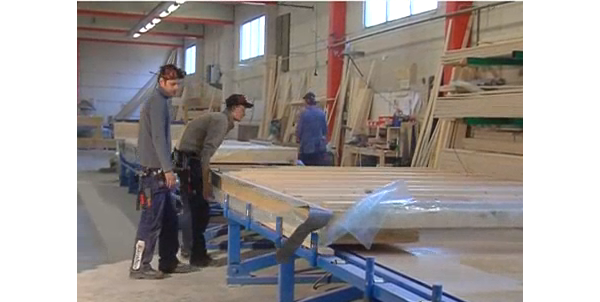
What we are about to see is the Swedish Flip Table - a hydraulic tilting table that allows you to easily turn a wall panel over so you can work on both sides. That is the key really - keep the panel on a table so you can reach everything without ladders, and be able to flip it over so you can work on both sides. Each side of the Flip table is a workstation where you can complete both the inside and outside of the wall. We saw this table in the full automated line, but here we can see how just this table allows a factory to set up a simpler and effective work flow. In this example it is supplemented by an additional work table on either end of the flip which expands the total workstations to four. Smaller factories often use just the flip table, or two.
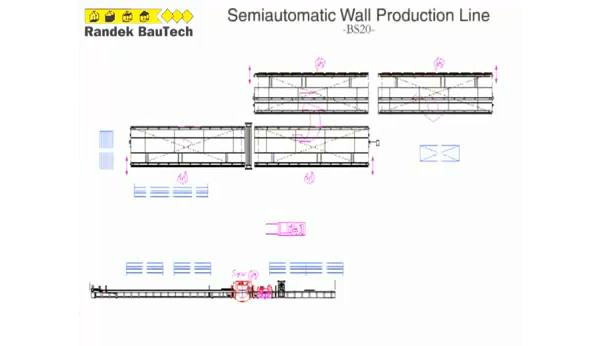
Here is a diagram of the line, not labeled as with the automated line, but its so simple we'll explain below:
Here are the steps in the line:
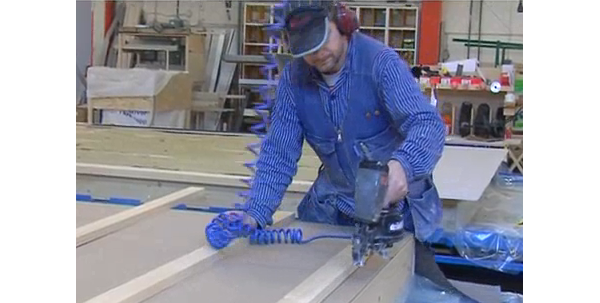
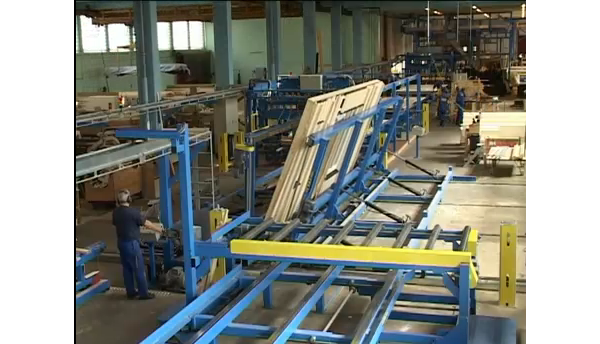
- the first table is the framing table. It has hydraulic clamps which allow you to set up the entire stud panel, and then rapidly nail it all into place.
- the flip table is in the middle. Both sides of the table can be used at once, when the second side is finished and clear, the panel from the first side is flipped over and the work begins on the other side.
- the stand up table is the last table. The work on the panel is finished there, and then the panel is stood up on end to be taken away for wrapping and transport.
Lets look at the sequence in detail:
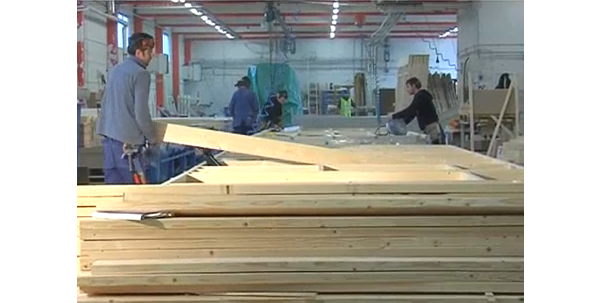
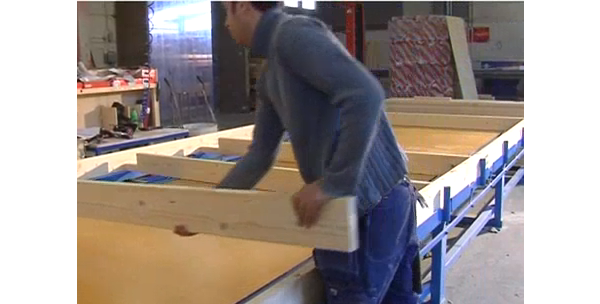
Studs, top, and bottom plates are first cut according to a list made for the wall panel. A factory may have an automated cutter, or simply a man with a cut list. The studs for a given panel are staged at the end of the table and the pieces are laid out. The table then clamps them all together so they can not move, and the workers can nail them all very rapidly. Note that unlike other examples we've looked at the windows are not installed, but in other examples a separate worker would have been building the window opening frame and another putting the window into it and then adding it to the staged material here.
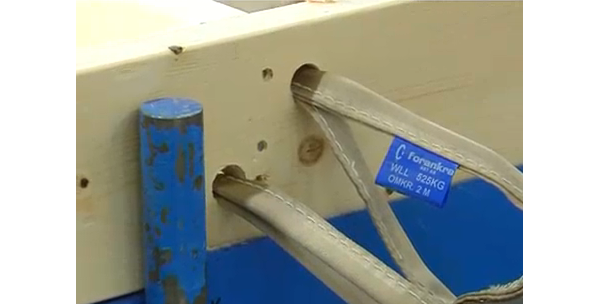
Also at this time the lift straps for the panel are installed.
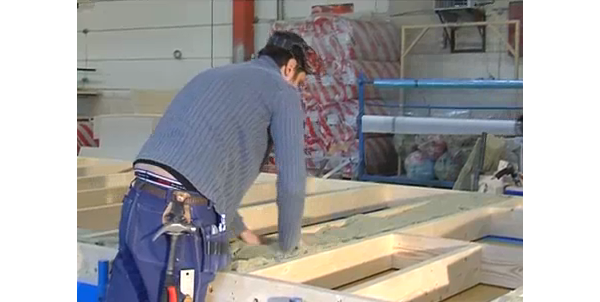
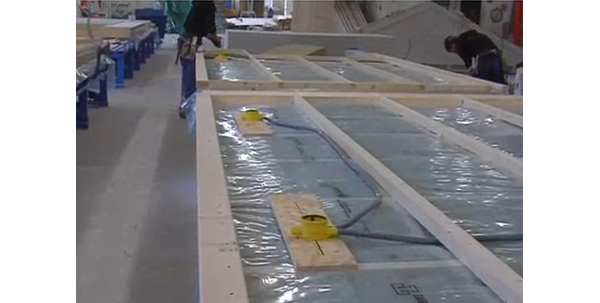
While still on the framing table insulation is installed filling the stud spaces completely.
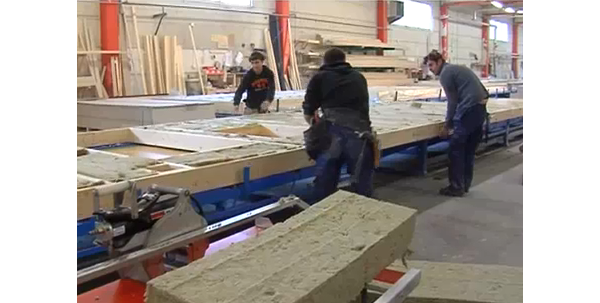
Then the panel is rolled down the line onto the first half of the Flip Table.
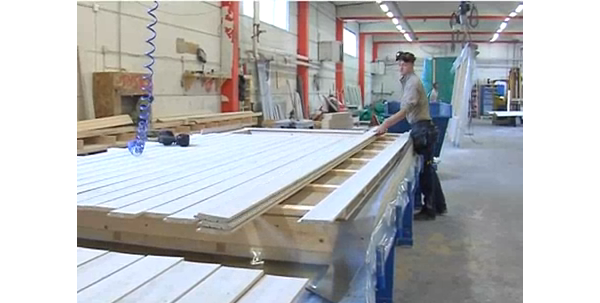
The interior vapor barrier is added next. Note the table includes a large roll holder so that the handling of the large sheet is easy and fast, nothing like trying to hang sheets on a vertical wall.
next the interior is finished
Electrical boxes are put in place, and the batten strips that hold the gypsum board. Note that all of the electrical work is inside the vapor barrier. No punctures, no air leaks.
Next the interior layer of insulation goes in-between the battens. The change in orientation of the battens and studs means that this layer of insulation prevents any direct thermal bridging of the studs to the interior. This is something that we are struggling with in high performance houses in the US. Many well respected experts have been advocating for exterior foam for the same purpose, and reversing the typical interior vapor barrier to the exterior because the foam insulation will block vapor anyway. I much prefer the Swedish technique we see here.
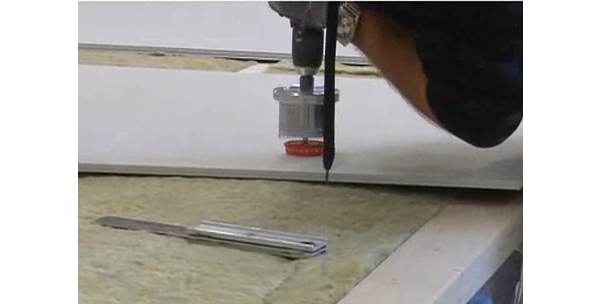
Next the interior gypsum board is mounted. What we see here is the magnetic finder on the hole saw for the electrical boxes. The magnet centers the drill, and a round hole is cut for the box. Easy, fast, and designed to be that way. Why are our electrical boxes square?
Drywall done, time to flip the panel.
Now work proceeds on the exterior of the wall. First sheathing panels are added, and then batten strips for the exterior siding. In this case the panel will get horizontal tongue and groove boards, so the battens go vertical over the studs.
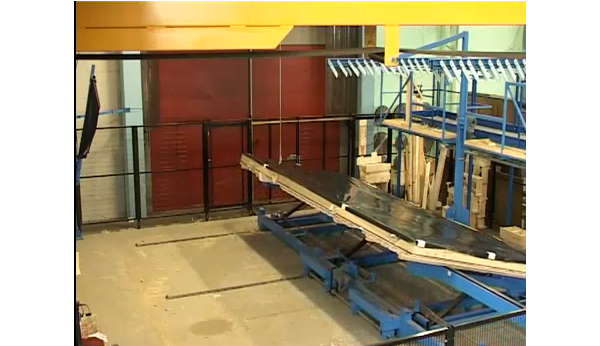
When battens are done the panel is rolled to the last table, the stand up table.
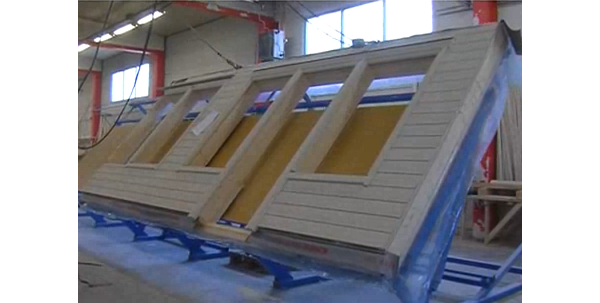
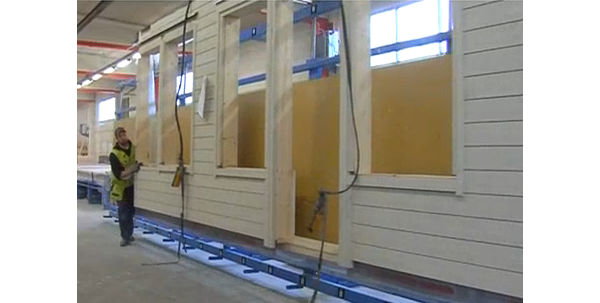
Siding boards are installed, and all the window and door openings trimmed.
When the panel is done the lift straps are attached to the conveyor track above and the wall panel is tilted to vertical.
If this was a smaller line with only the flip table, then the flip table would be used to bring the wall panel to vertical.
The slack in the cables from the conveyor are taken up as the panel is raised. When vertical it swings off the table and the worker can push it away for wrapping and to await shipment.
And so even a small factory can set up a very efficient work flow for creating their wall panels. No multi-million dollar automated lines, and few excuses either! Enjoy the video below of the entire process:
We've described the Swedish method of building off site in several past blog posts, but today we will take a closer look at the assembly line to get a better idea of how you build walls this way.
The first thing I have to explain is that a fully automated line like this is not needed to build houses the way they do in Sweden. In fact most of the small factories do not have these complex machines, and are using a simpler process, more manual, less automated. But what they both have in common is a reduction in wasted effort, a lean process of building. In the next few days we'll also look more closely at how they build without all this machinery.
But first this machinery. The Swedes build wood houses in a particular way, and so a Swedish company named Randek Bautech builds machines that automate the way the Swedes build houses. They can't expect a German company or a Japanese company to do this, so they invent their own. Makes perfect sense. What exactly do I mean by that though? Well for instance the Swedes use solid wood siding when they use siding on their houses - not vinyl as common in the US. So they create a machine that can nail their solid wood siding. Obviously this would not have much use for a large US builder who primarily uses vinyl siding. Ok, got it?
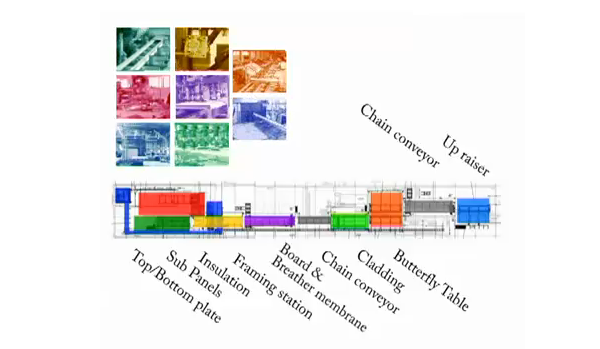
Randek Bautech provides a great video of this line in action which I will post here. But first lets look at the line:
It goes in this sequence:
- top and bottom plates of the stud wall cut to length
- sub panels means the studs that form up window and door openings
- insulation cut to fit the stud spaces
- framing station is where the wall studs and plates come together
- board and breather is exterior sheathing board, and the vapor permeable air barrier
- cladding is where the solid wood siding is applied
- butterfly is their name for the flip table that turns the wall panel over
- indications of chain conveyors are areas where the wall panels are transferred between stations and some manual portions of the work are completed.
- finally the up raiser is the machine that stands the panel on end so it can be conveyed to be wrapped and loaded on the truck.
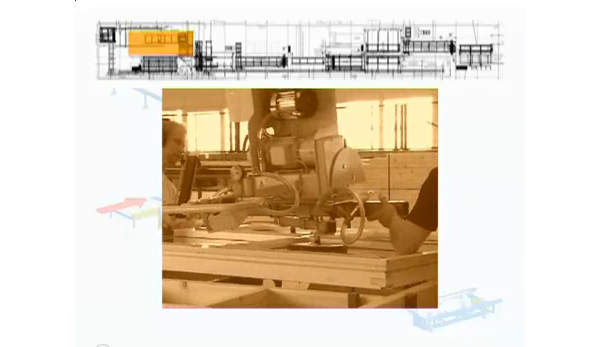
Lets look at some stills of each step now.
This is the sill plate being formed. It is in two parts bridged by a thin panel - this is because it sits on top of a center plate that is pre-attached to floor, so the wall panel aligns itself when placed. This makes sense because your precision happens when you nail the center plate to the floor - easy, not when a 2000kg panel is dangling from a crane - not easy.
Here is the sub-panel station, where we see a window being installed into the framed opening. Yes, that's right, the window is installed before the wall is even framed. This whole assembly will then find its place in the line of studs making up the given wall.
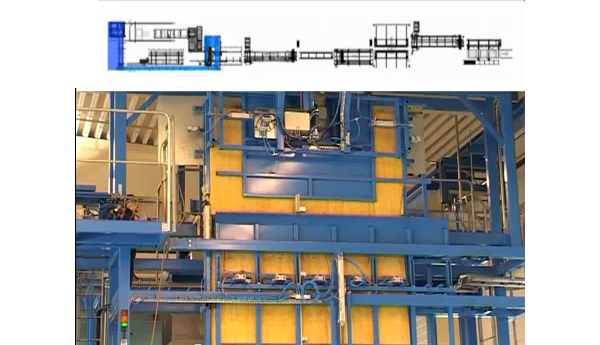
This machine unrolls the insulation batts, and cuts them to fit the spaces coming in the wall panel. One of the worker will tamp them in to be sure they are positioned correctly.
The framing station where the plates and wall studs are joined - now you have a panel.
This is where the wall sheathing is cut and applied, and the wall wrap put on the exterior. From here it enters one of the transfer sections where battens are applied for the upcoming siding.
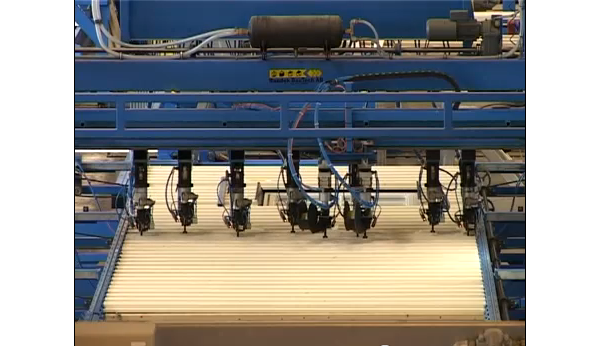
Here the siding panels are automatically nailed to the wall panel over the battens. Each of those nailing lines are following a batten line, with additional nail lines positioned over and under the window to fasten the ends of these short boards.
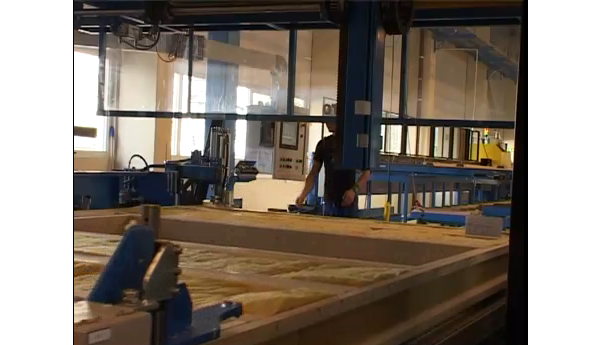
The flip table makes short work of turning over a large wall panel so you can work on the other side. Now the interior air barrier can be fastened. In the video the line stops there, but the transfer area here can also be used to fix interior battens, electrical boxes and wiring conduits, and finally the interior gypsum board.
And finally the wall panel is stood on end, passed by cart to the next worker who will wrap it and then stow it in a rack, and eventually loaded on the truck for delivery.
And like this an entire house can be fabbed in a day, easily. As we've seen in other videos those panels then delivered to a site with a waiting slab will also be assembled in a day. I assure you the bulk of wasted time has been wrung out of this process. Enjoy the full video below:
The first step is taking apart the old house, so the foundation can be expanded and the new house built on top of the new and old. The owner has been posting a non-stop stream of photos on their project blog, and we've loaded them in a photo browser for you here.
Get the flash player here: http://www.adobe.com/flashplayer